
File Selectors
 <I>By Kev Beardsworth...</I>
The File Selector, love it or hate it there’s absolutely no way of
avoiding it.
Every time you want to load a file into your favourite program it pops up out of the blue begging for your attention. Back in the dawn of time when the operating system in your Atari was still a puppy, the concept of a file selector was revolutionary. Files on your floppy disks were just a mouse click away. By todays standards the first TOS file selectors are very basic. If you want your computer to look at a different drive you have to type the path onto the Directory Line. Many ST users will still be doing this as an update didn’t appear until TOS 1.04. The main change was the addition of 16 drive buttons A through to P. Typing was still required to set-up a filter but most of the work could be carried out with the mouse. Since this modification evolution of the TOS file selector has ceased. With the launch of the Falcon the OK and Cancel buttons were moved and its looks were improved slightly by giving it the 3D treatment. These were the only changes made.
Why Atari didn’t improve the functionality of its file selector is a mystery. It worked, so why change it. There may well be another reason though, replacement file selectors are big business. Mainly due I think to Atari’s lack of improvement on this front. This article is a brief run down of every popular file selector from the TOS base model up to the super dooper multi-tasking GTi variety.
“Replacements” I hear you cry. Why yes, one of the great features of Atari’s baby is the ease with which some operating system functions can be improved upon, the file selector is a classic example.
You may think that the Atari file selector does everything asked of it and you can’t think of any more features you would like included. Well here is an illustration. You’ve finished working on your latest master piece but haven’t saved it yet. You’re getting tired and it’s about time you were in bed. You start to quit the program and it tells you that you haven’t saved your work so you select save, horror of horrors there is no room on the disk. You look frantically for another but they are all brand new and haven’t been formatted yet. You can’t delete any of the work on the current disk because it’s too valuable. You’ve one option only, quit back to the desktop, lose all your work, format a new disk and start all over again. But hey, just a minute you installed that fancy new file selector yesterday and its got a built in format function. Wiping the sweat from your brow you relax as the new selector saves the day. Formatting is just one function included in many of todays file selectors. But lets go back to the beginning.
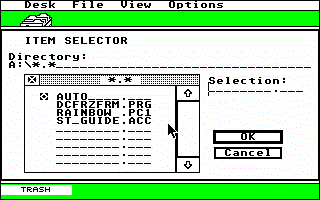
As can be seen the file selector built into TOS 1.0 and 1.02 is very basic. There are no drive buttons, if you want to look on a different drive you have to clear the directory line and type in a new path. This selector had an annoying bug, if after entering a new path, you pressed Return the file selector would vanish. This should not happen if the Selection line is empty, the new entered path should be displayed in the file selector window. One way around this bug was to left click on the file selector window update box. This can be seen in the top left hand corner of the window. The directory line can also be used as a file filter. In place of the . you could type *.TXT. After clicking on the update button the window would only display folders and *.TXT files. This is incredibly handy if the current path is full of many different file types.
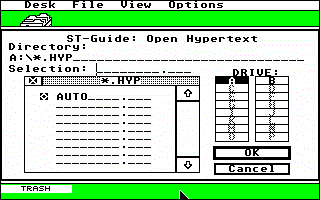
The file selector was improved for TOS 1.04. Drive buttons were added and the bug previously mentioned was fixed. It remains in more or less this form today.
Obviously there is a lot of scope here for improvement. Many different replacement file selectors have been released but we’ve trimmed these down to four main entrants. We’ll cover each one in turn.
# Universal Item Selector III 
The first to enter the arena is the Universal Item Selector III. Unique in its field because it’s the only commercially available replacement. At one time considered by many as the best file selector available.
Obtained from the FaST Club and currently up to version 3.32. It is supplied on one disk and comes with a very well written 44 page manual.
Similar in some ways to the TOS variety this one comes stacked with features. Most of the disk and file operations carried out on the desktop can be performed from inside UIS III. Formatting disks, copying, moving, deleting or renaming files and creating folders. These are all easily achieved from various buttons displayed around the selectors main dialogue.
Multiple files can be selected at once for any of the file operations. Once selected these can be dragged to various points around the selector. If dragged to the question mark icon a display will inform you of their size. The P button gives a full directory print out. Dragging files to this button will give you a partial directory print out showing the selected files. If you only drag one file to the button you get the choice of showing or printing the file, the same function as the show/print/cancel available from the desktop. A tick button is also included, files dragged here can have various attributes altered. These include Read/Write, Read Only, Show, Hide and Touch. The touch button updates the file time/date stamp to the one currently stored in your Atari’s clock.
Often you want to see what’s behind the file selector, UIS III can be moved easily, simply click and drag. One of the great UIS features is in it’s ability to be set at various sizes. It can be set to display the same amount of files as the standard TOS selector. The window can be widened to show the files size and date or can alternatively be set to display 36 files at once. These will be set in three columns of twelve. Font size can also be altered between large and small.
 Common to most replacement file selectors is the ability to store regularly used paths and file masks. UIS can store up to ten paths and twenty five search masks. Useful if you use a hard drive or are always loading certain types of file.
Pre TOS 1.04 users who’ve longed to carry out the four fingered salute - reboot your Atari using the keyboard - can do this once UIS III is installed.
On the whole a very good replacement file selector. A little over shadowed maybe by later rivals. If you just want to get rid of that awful TOS selector, and get a good manual into the bargain this one comes highly recommended.
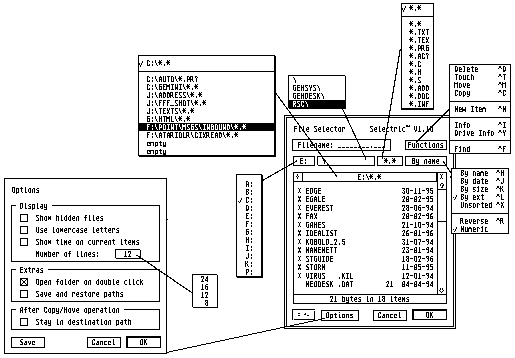
Selectric
Selectric became King of the file selectors almost over night. Today it is the selector by which all newcomers are measured. Available as shareware and supported in this country by CyberSTrider it proves that shareware programs can be better than anything released commercially.
Selectric also introduced the concept of passing many files to one application. Obviously the application in question has to support this function.
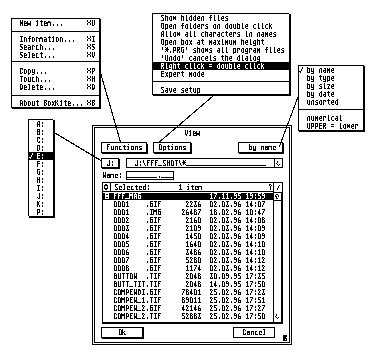
Many of the features in Selectric match those found in UIS so why is it more popular? It could come down to looks, Selectric looks the part, but there is more to it than that. All functions are hidden behind popups keeping everything neat and tidy.
 The auto locator makes this selector so easy to use. Start typing in the first letters of the file you’re looking for and Selectric will jump to the closest match.
As you enter folders Selectric maps the route. Left mouse click on the ’Mac’ path pop up or press F2 and each folder above the current one is listed. This way you can jump back more than one directory at a time or all the way back to the root. If you enter a folder and then exit the slider stays put, it doesn’t shoot to the top again. Anyone who has used other selectors for any length of time will know how annoying this can be.
The find function, accessed though the Function popup supports full wildcard searches. Vital if you can’t remember the name of the file you’re looking for. You’ll also be able to create new files or folders from in here as well as get basic drive information. Handy if you not sure whether that new file will fit in the space available.
In the sort popup are the four standard sort modes found at the desktop. In addition to this is an unsorted option, great for checking the Auto folder program run order. There are also reverse sort and numeric sort functions. The numeric sort option comes into play when you name files using numbers. You may create files called <I>mytext_5.doc, mytext_2.doc, mytext11.doc</I> and <I>mytext_4.doc</I>. With the numeric switch on these would be shown as <I>mytext_2.doc, mytext_4.doc, mytext_5.doc</I> and <I>mytext11.doc</I>.
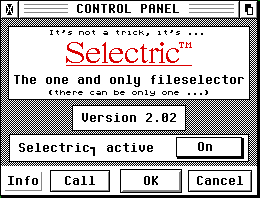
Supplied with this selector is an accessory and a CPX. Both can be used to call the selector. Additionally the CPX can be used to switch Selectric off, just in case you need to return to the TOS selector. This may be necessary if it clashes with a piece of your software. Having said that I’ve been using Selectric with no problems for some time.
Selectric is still one of the best. If I was going to be really picky I’d complain about its lack of a floppy disk format function. Also you need to have Let’em Fly installed to make it manoeuvrable. Apart from this it’s just about perfect for the single tasking Atari user. Selectric along with the vast majority of selector replacements is very easy to install. All you need to do is copy the Selectric program to your Auto folder. It will then appear instead of the TOS version whenever a program requests it.
# Boxkite Boxkite is what I’d describe as a Selectric clone without the looks. It includes many features missing from Selectric. The main one being support for long file names. To be precise file names up to a length of 32 characters. These are only accessible though under MiNT or MultiTOS using the installed file system Minixfs.
 The main dialogue is resizeable like a window by dragging on the bottom right gadget. It can display up to 100 file names providing you have a large enough monitor to display a file selector this high.
Another good feature of Boxkite is the single right click equals double left click feature. A great idea being adopted by more and more programs, the Thing and Ease desktops among them.
Boxkite also supports symbolic links. Another MiNT, and now MagiC 4 feature. A symbolic link is very similar to dragging icons onto the desktop. You only need store one copy of the file one your drive but can access it from different locations and under different names. A sort of space saving device.
Boxkite doesn’t really make the grade when compared directly with Selectric. It only steps ahead for the few Atari users using MiNT or MultiTOS. It may have a use under the new MagiC 4, but for reasons we’ll discuss in a minute I doubt it.
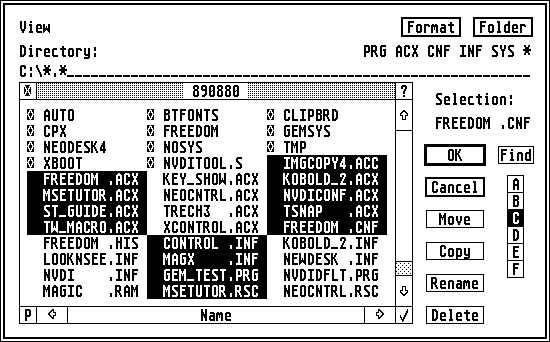
# Freedom All file selectors have one large disadvantage when you are Multi-tasking. They are modal, this means when they open everything running in the background stops. Freedom is the exception that proves the rule, it is non modal. If there’s an unwritten rule book for Atari file selectors the Freedom authors obviously haven’t heard of it.
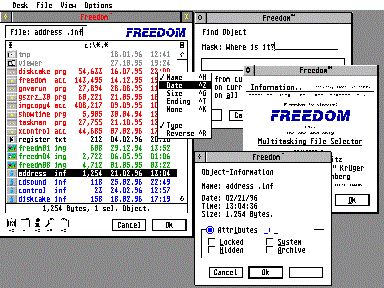 Freedom has looks Selectric would die for and features Boxkite hasn’t even dreamed of. Put simply it’s the most powerful file selector ever written. It can use Kobold for file operations, it fully supports the Gem Clipboard and the AV Protocol. It’s a power users dream.
The big clue is in the name, ever noticed how your computer stops working when you open the file selector in a multi-tasking environment, annoying isn’t it. Well this selector doesn’t do that, true Freedom indeed. Your computer will happily go on working while the Freedom file selector is open. In fact you can have up to eight Freedom’s open at the same time.
Selectric introduced some new standards for file selectors and for this reason Freedom can do everything Selectric can do and is 99% Selectric keyboard compatible. It also supports long file names, can have a program installed as a viewer or use your replacement desktop installed application viewer, (providing your desktop supports the AV protocol). Freedom is fully configurable allowing user definable font and size, user definable icons next to file and folder names, import/export paths to/from the clipboard plus file delete, copy & move using Kobold. There’s even a built in file search which also refuses to lock up your system while it’s working or, if you prefer you can use an external search program such as Paraffin.
The list goes on and on.
One of it’s neatest tricks is in the use of both mouse buttons. Left clicking on a button brings up one function and right clicking on the same button brings up a slightly different but related function. For example if you right click on the word <B>FILE</B>, a list of user pre-defined files is displayed to you. If you left click on the word <B>FILE</B> a history list is displayed showing you all the files you’ve previously loaded. The selection of masks is equally useful, right click on the file extender and you can choose from a list of pre-defined masks, left click and it shows you the file extenders available in the current directory. So if you go into your clipart folder and in there are *.IMG, *.TIF and *.GIF files, left clicking will let you choose instantly between these three file extenders adding . at the beginning of the pop-up in case you need it. Double clicking enters the mask edit dialog for those of you wishing to enter your own masks.
There are many hidden but handy features inside Freedom. Mouse clicking on the characters that make up the path allows you to quickly navigate around your hard drive. If you right click on the path a list of pre-defined paths is displayed. Left clicking gives you several choices depending on which area of the path you’ve selected. If you select part of the path that includes a folder name Freedom displays a list of folders in that directory. Select the backslash character and Freedom will jump to that path instantly. Obviously selecting the drive letter gives you a choice of drives matching those connected to your system.
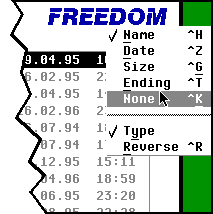
Other areas where mouse clicks produce a response include the window scroller and the five icons found at the bottom of the selector. Clicking on the scroller button gives you the sort dialog. The five icons include trash can, search, info, clipboard and create file/folder. All have the dual use of left/right click or if you prefer single left click, double left click. It goes without saying that the selector can be moved, re-sized, iconised, cloned, operated on in the background and supports multiple file selection for those pieces of software that can handle it.
Obviously this selector is designed for multi-tasking but it still works in a single tasking configuration. I would recommend the use of Gemini, Ease or Thing though, to get the best out of it.
There is one dark cloud in an otherwise clear sky though, you cannot currently save the selectors configuration, if you want to personalise this selector you will need your trusty text editor to manually edit the config file. However the file is very clearly commented and I found it straight forward to edit. The author assures users that a configuration program is in development, so it’s not that bad.
As you can probably tell I love this file selector, it’s very well designed and apart from the config file, easy to use. It’s probably a little memory hungry but for features like the above and another page full I haven’t even mentioned, 120kb is memory well spent.
The Best of the Rest
Many software programmers realising that the TOS selector is inadequate build their own into the applications they are developing. Below are a few examples.

The Interface file Selector.
This is the selector built into Interface. It is automatically set up to look for *.RSC files. It can store different paths and sort files by name, date and extension. The extra functions it can carry out include disk formatting, copy/delete files and create new folders. It can be disabled if you want to use your own replacement.

The That’s Write 3 Selector
The That’s Write 3 selector has no built in extra functions as these already exists in That’s Write 3. The built in Macro language is the primary reason for including a custom file selector. Macro commands can be executed by this selector. You can, as in Interface, use your own. Do remember though that macros including file selector functions will stop when your replacement is displayed.

The MagiC 4 Selector
MagiC 4 is a full OS replacement. For this reason it has a custom file selector. It’s pretty basic, in fact it’s only slightly more advanced than the normal TOS selector. However if you’re running MagiC 4 the chances are you’ll be using Freedom. Having said that there are still one or two programs that play up when Freedom is displayed under MagiC. The Freedom authors realise this and include an option in Freedom that disables it when these problem programs call the file selector. So even if you’re using Freedom you’ll still see this selector from time to time.

The Geneva Selector
The best “built in” selector around.
Most of these custom file selectors are pretty basic and are easily beaten on the features front by the likes of Selectric. Geneva’s selector however has some very powerful features. Unique in having the only 2 window display, showing folders on the left and files on the right it is easily Selectric’s equal. Geneva has no desktop unless you use a replacement such as Neodesk or Thing. You’d think this was a major draw back but no, the Geneva file selector can perform most of the file operations found in your average desktop. You can’t move the dialogue and it’s modal, strange when you consider that Geneva is a multi-tasking OS.
# The Future The future is closer than you think.
Here’s a sneak preview of the future. Freedom 2. Not only a file selector but also an Xcontrol panel replacement. CPXs are run in their own windows and can be various sizes. These new CPXs are called ECPXs or extended CPXs. Freedom 2 also addresses the main problem with Freedom 1, it now has a configuration program.
# Conclusion If you’re multi-tasking or single tasking with a full AV Protocol server such as the replacement desktops Gemini or Thing, Freedom can’t be beaten. Put simply it is the Rolls Royce of file selectors. However if you are single tasking with the GEM desktop on a on a standard ST you can’t go wrong with Selectric or UIS. Selectric would be my personnel choice. MultiTOS users can of course use Boxkite, but again with the alternative being Freedom I think you’d have to be a little crazy.